When most people in the fitness world hear the word recovery, they think of the usual things: trying to get more sleep, eating better, and trying to not be so stressed out all the time. (Or if they’re into some of the newer trends, maybe they think of hot saunas, ice baths, float tanks, cryotherapy, and meditation.)
These are all good strategies, of course. The only problem: Most people fail to follow them with any kind of consistency.
Throughout my career, I’ve always tried to look at the bigger picture of what’s really going on. When it comes to recovery, the biggest thing I’ve seen is that the strategies I mentioned above generally take place outside of the gym.
This is an important point. And it says a lot about how much we value recovery—and how we usually only pay lip-service to it.
The way most people approach fitness right now, their time in the gym is where they grind it out and push themselves to the limits of fatigue.
Recovery, on the other hand, is generally thought of like extra credit: it’s worth a few extra points if you get it done, but it’s not a big deal as long as the main assignment (the workout) has already been turned in.
If you read my article on why our obsession with high-intensity training has failed us all, then you already know how flawed this approach is and why it doesn’t work.
It’s time for a new approach, one that will help you finally get the results you’ve been working so hard for.
That’s why today I want to share a specific kind of workout you can start doing immediately to stimulate recovery, get better results, and leave the gym feeling better than when you walked in.
Quick heads up: if you’re not sure if you have time to read through this whole article now, make sure to take a second to download the sample recovery workout below to try for yourself.
What Separates Elite Performers From Everyone Else (Or, What the Military Knows That the Fitness Industry Doesn’t)

Back in the late 90’s and early 2000’s, the US military started investing a ton of money and resources into studying what they called “burnout” and fatigue in their different special forces units.
Their aim was to try to sort out why some soldiers were able to handle the stress of battlefield situations well (maintain navigational skills, shoot accurately, make the right strategic decisions) while others simply couldn’t.
As part of this research, they tracked special forces soldiers throughout a variety of stressful periods, such as when they were going through selection and high-level combat training courses.
During these times, they evaluated their performances in various cognitive and performance-based tests while also measuring and tracking a variety of stress hormones and markers, including adrenaline, cortisol, Neuropeptide Y (NPY) and even heart rate variability, (HRV).
The goal was to understand if there were certain physiological traits that separated the soldiers that could handle stress from those who couldn’t handle stress.
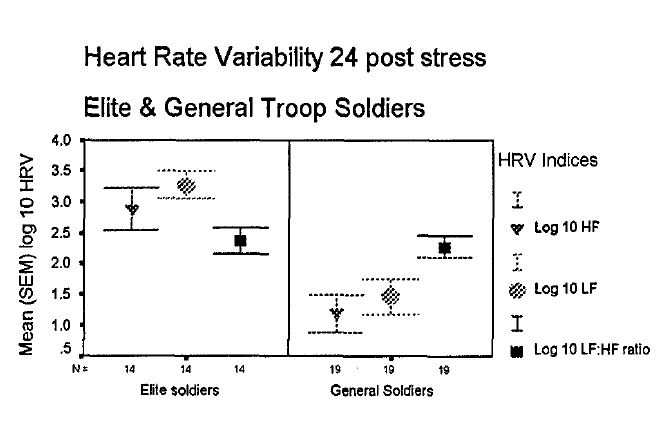
Without question, the thing that stood out the most was the heart rate variability (HRV) data. The “elite soldiers”—the ones who were able to make it through selection and survival school—had much higher heart rate variability (HRV) 24 hours after the stressful event occurred.
Check out the photo below. You can clearly see a stark difference in HRV in the elite soldiers vs. the general soldiers.
“How did I miss this before…?”
When I initially read through all the military research a few years ago I found it interesting, but not too surprising. It wasn’t until a year ago that I revisited the data…and had something jump out at me that I had missed before.
Here was the paragraph I missed:
“We have found that individuals that have better stress tolerance exhibit significantly different patterns of HRV both at baseline and during stress exposure. These differences in HRV are predictive of actual military and cognitive neuropsychological test performance scores assessed during and after stress exposure.”
There it was, staring me right in the face: “patterns of HRV…predictive of test performance.”
In short, the military had discovered that certain patterns of HRV could actually predict how well soldiers could perform in the face of stress.
Once I realized this, I knew I had to find a way to translate these findings into the fitness industry.
After all, if the military could determine how HRV patterns predicted whether or not a soldier would be successful under stressful situations, perhaps I could do the same thing with my athletes.
This is how I started down the path of using machine learning—a form of artificial intelligence (AI)—to find patterns in HRV that could make predictions about fitness.
The World’s Largest Database of HRV—And The Story it Tells
When I originally launched BioForce HRV back in late 2011, my goal was to give people access to the same powerful technology I had been using with all my clients and athletes for the last 10 years.
Up until that point, I had been using an HRV system that costs upward of $30,000. But the rise of mobile phone technology made it possible to finally make HRV accessible to everyone.
I didn’t realize it at the time, but building a database of over 1.5 million HRV measurements collected from thousands of people over six years would prove to be far more valuable than I could ever have imagined.
After crunching all the numbers to see if I could find any patterns and trends that would help provide a better understanding of the relationship between training, stress, recovery, and changes in fitness, one pattern immediately jumped out:
- People that saw an increase in their HRV the day after a high-intensity training session were 300% more likely to also see an increase in their average HRV (a marker of general aerobic fitness levels) over the following 3-5 days.
In short, I found the same pattern in HRV that the military did. What the data shows is that HRV measured the following day after a period of stress—high-intensity training in this case—can actually help predict whether or not you’re likely to see an increase in fitness in the following days.
Why is this so important?
The answer is because it provides a very clear link between recovery in the first 24 hours after an intense training session and the results you’re likely to see.
I’m going to repeat that.
There is a very clear link between recovery in the first 24 hours after an intense training session and the results you’re likely to see.
This means that in order to maximize results, the most important thing you can do is to shift your body into what I call the “Recovery State” within 24-48 hours following a high-intensity session.
This is FAR more important and a much better approach to fitness than just following up one high-intensity session with another, and another, and another.
Even though I was only able to evaluate 24-hour HRV against one measure of fitness, the link between the two is nonetheless hugely important since it supports the same data from the military research. It shows just how crucial recovery is.
The ability to shift your body into the Recovery State is the real difference between getting the most results from all your hard work — or getting burned out.
So many people are putting in the work, but not seeing the full rewards (gains) because they simply don’t have this ability.
Why Shifting Your Body Into The “Recovery State” Is The Key to Unlocking The Results You’ve Been Training For
As I mentioned earlier, most people think of recovery in terms of activities: sleep, eating enough protein, not freaking out about work. But recovery is much more than that.
Recovery is all about energy.
More specifically, it’s about where your brain chooses to devote its precious and limited energy resources.
There are literally trillions of cells throughout the body that all need energy.
So your body is going to make sure your basic survival and activity needs are met before it devotes resources towards the costly processes involved in remodeling tissues.
In other words, your brain is more interested in keeping you alive than it is helping you build bigger muscles.
The best way to understand this, is to think about recovery as a state in the body that drives energy towards repairing and remodeling tissues to be bigger, stronger, and more functional.
I call this the Recovery State.
Just like the “flow state” that’s gotten so much attention lately, there are specific things we can do to shift our body into the Recovery State—and when we do we, our recovery (and the results we get from it) can be dramatically accelerated.
Inside the Recovery State
How Your Body Shifts Into the Recovery State (And What Prevents It From Happening)
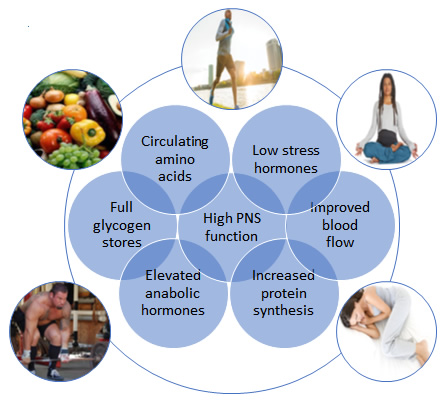
As you can see from the diagram above, there are several different things in the body that are needed to drive it into a recovery state, ranging from high levels of circulating anabolic hormones and amino acids to good blood flow and full glycogen stores.
Equally important to this equation is low levels of stress hormones.
This is because when stress hormones are in the bloodstream, the body automatically shifts its energy away from recovery and towards dealing with whatever is causing the stress hormones to increase—even if it’s only mental stress.
In short, all forms of stress are catabolic, while recovery is anabolic.
The primary difference between the two is nothing more than where the majority of our energy is being directed to.
The most important thing to point out is that at the center of the Recovery State, you can see that high parasympathetic nervous system (PNS) function is connected to everything.
This is because it’s this part of the nervous system that drives a lot of the anabolic (building) processes involved in recovery and it’s why HRV is so strongly connected to recovery.
HRV is a marker for the level of parasympathetic nervous system activity.
When HRV is increased, it’s a sign that the body is in the recovery state.
When HRV is decreased, it tells us the body is in catabolic state and recovery is dramatically slowed down – the exact opposite of what you want.
The elite soldiers in the military research were able to handle the stress of selection and combat school because they were better at shifting their body into the Recovery State.
By the same token, people using BioForce HRV that saw their HRV increase the day after a high-intensity workout were also much more likely to see their fitness increase because they were able to divert more energy to recovery.
They had more energy going towards building bigger, stronger muscle fibers, more mitochondria, improving nervous system function and cementing new skills and abilities in their brains.
This shows us just how important being able to shift into the Recovery State is—it’s literally what makes or breaks the results of all your hard work.
Because of this, I’ve spent the last year or so testing (often on myself), tweaking, and refining a specific method designed to help the body shift into this Recovery State and provide the necessary balance to high-intensity training.
Introducing Rebound Training: A New Kind Of Workout To Help Shift Your Body Into the Recovery State
Although the concept of using training as a form of recovery certainly isn’t new, the way it’s often done today leaves a lot to be desired.
More often than not, it consists of nothing more than a couple of mobility drills followed by some low-intensity cardio and a few sets of random weight lifting.
This form of recovery is flat out boring and only marginally improves recovery.
Let’s face it, there’s a reason people often skip doing this sort of recovery work in the gym: it just doesn’t feel like it’s worth the time and effort. (And in most cases, it isn’t.)
Based on the research and my own experiences with HRV over the years, I knew there had to be a much better way to use the gym and training to accelerate recovery.
One that wasn’t boring and one that was so effective that you could literally feel the difference afterward.
The search to find this better approach is what led me to develop High-Performance Recovery (HPR) Training, but I like to call it “Rebound” training for short, because that’s exactly what it helps your body do.
After a great deal of experimentation, trial and error and countless HRV measurements along the way, I’ve put together a new way to get in the gym and train to accelerate recovery.
Rebound Training:
- Shifts your body into the Recovery State in the hours following the training session and helps amplify the effectiveness of your previous higher intensity training.
- Stimulates blood flow into every muscle fiber without providing too much additional stress that’ll slow recovery down rather than speed it up.
- Activates the parasympathetic nervous system — so that HRV will be driven up in the hours following the workout.
- Develops the metabolic systems in the body that drive recovery — so that your overall ability to tolerate and handle the stress of life is improved.
- Improves your breathing and movement quality in a way that can reduce joint stress and help avoid unnecessary increases in stress hormones that can sabotage your recovery.
- Is actually fun (and challenging). HPR isn’t boring or monotonous and takes no more than 30-45 minutes from start to finish. Which makes it easy to fit into your weekly schedule.
- Is highly effective. After an HPR session, you’ll leave the gym feeling much better than when you walked in.
I’ll be blunt: Anyone who is serious about their training needs to start including Rebound Training as a regular part of their programming.
Not only does it help your body shift into the Recovery State within the hours after the workout, it also develops your body’s ability to shift into this state faster and more effectively.
This has huge implications for your fitness and your health.
The Skill We Must Learn If We Want to Get the Best Possible Results
One of the most important things I’ve discovered in my career is that shifting into the Recovery State is actually a skill—one that can be learned and thus one that has to be trained if you want to develop it properly.
What I’ve learned (and what the data shows) is that the more you develop the systems within the body that are responsible for recovery—namely the parasympathetic nervous system and the aerobic engine—the more recovery potential your body has.
This means it can ultimately handle higher levels of stress and come out even stronger on the other side rather than fatigued and broken.
The elite soldiers in the military research excelled in this skill.
You may not be in the special forces, but in the face of all the high-intensity training and the stress of daily life, the ability to shift your body into the Recovery State is an incredibly important skill to have.
It’s literally what makes or breaks the results of all your hard work.
What a High-Performance Recovery (Rebound) Training Session Looks Like (Plus, a Free Workout Download)
Now that we have a decent understanding of how the body responds to stress and why learning how to shift your body into the Recovery State is critical to seeing the results you want, let’s get into the nitty-gritty of what an HPR training session actually looks like.
Note: I’m going to provide an outline of Rebound Training below, but to get a complete training template including exercises and descriptions of how to do them, click the button below to download it now)
Before you even get started: First, the most important thing to understand is that every Rebound Training session needs to start with the right mindset.
Instead of going into the gym feeling like you need to crush yourself to make any progress, you need to make the goal of the day to walk out of the gym feeling better than when you went in.
If you can do this, then it means you’re on the road to recovery and the session accomplished what it was supposed to.
With that goal in mind, there are four key components of an effective Rebound session:
1. Recovery Breathing (5-10 min)
The concept of using specific breathing and movement patterns together to promote parasympathetic nervous system function and recovery was first introduced to me by Bill Hartman and Mike Robertson several years ago.
After Bill was able to fix a nagging shoulder injury that I had been dealing with for months in no more than few minutes of this type of work, I became a believer.
What I discovered through Bill’s help is that with recovery breathing exercises, we can tap into our autonomic nervous system through a specific form of breathing tied to targeted movements.
This serves to help develop better, more efficient breathing patterns and reduces the stress that can be associated with certain movements that often sabotages our recovery.
To see specific examples of recovery breathing movements, you can download the training template above.
2. Recovery Zone Training (15-20 min)
Training in the recovery zone is something I’ve spent a ton of time researching and experimenting with throughout the development of Morpheus – the world’s first digital recovery coach (If you don’t know how Morpheus works, click here and I’ll tell you more)
Based on my years of experience using HRV, I’ve found that stimulating recovery is largely about getting the intensity right. If the intensity is too high, you cause more stress than anything else and recovery can actually be slowed down.
If the intensity is too low, however, then recovery isn’t stimulated and you don’t get the most out of the training.
The recovery zone represents this “Goldilocks” level of intensity: not too hard, not too easy…but just right.”
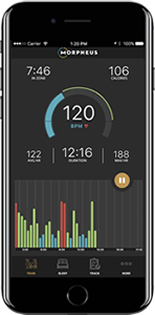
This is the sweet spot of Rebound Training and based on my experience and what the data I’ve collected has shown, it generally falls somewhere between about 72-88% of your max heart rate depending on your fitness and recovery levels for that day.
The more fatigued you already are, the lower this recovery sweet spot becomes and vice versa. Helping people get into their own recovery zone is one of the main reasons I started developing Morpheus in the first place.
You can see from the screenshot that Morpheus gives you a personalized recovery zone to train in, shown in blue on the heart rate gauge.
One of the great things about recovery zone training (and what separates it from the way traditional recovery work is often done) is that the sky’s the limit in terms of what you choose to do while you’re in that zone. In fact, the more different types of movements you can incorporate, the better:
- Medicine ball drills
- Prowler and sled pushes/pulls
- Bodyweight movements
- Battle ropes
- Box jumps and plyo’s
- Machine- based cardio: treadmill, bike, Versaclimber (one of my favorites)
- Calisthenics
Using different combinations of these types of exercises and more, you can choose to do recovery zone training in a couple of different ways. The first is simply doing circuits while keeping your heart rate relatively constant while you move from one exercise to another.
The second method is what I call recovery zone intervals. In this type of interval training, you drive your heart rate up to the top of your zone as quickly as possible and then give yourself 60 seconds of active recovery.
The goal is to see how far you can drop your heart rate in those 60 seconds and I’ve found this to be an incredibly effective and powerful way to train the skill of recovery. This is part of what I call dynamic energy control and it’s something I teach in my Certified Conditioning Coach Course because it’s an essential skill for anyone that needs to improve his or her conditioning.
As you develop this skill over time, you’ll find your HR dropping faster and faster, a surefire sign that your ability to shift into the recovery state will also be improved.
3. Strength stimulation (5-10 min)
Once you’ve finished the metabolic work in the recovery zone, the next step is to include a few sets of some additional, heavier strength work.
Adding this in serves to activate and increase blood flow into the highest threshold muscle fibers, which don’t get really get much work at the lower intensities.
At the same time, an additional benefit is that I’ve also found that when done in small doses, this simulation can also function to help prime the central nervous system and keep it running at a higher level. The biggest thing you’ll feel is that this priming effect often helps you feel stronger and get more out of a higher-intensity training session in the following day or two.
There are a few things you need to do to maximize the effectiveness here:
- Only perform one single total-body, compound movement. My personal recommendation is to use a deadlift, or deadlift variation, and drop the weight at the top of the lift (assuming you have a suitable platform).Doing this essentially eliminates the eccentric load and reduces total stress on various tissues while still driving blood into them. Other exercises can certainly work as well, but I’ve found the deadlift to be the exercise of choice here.
- Keep the volume low. Excluding a couple warm-up sets, you should do no more than 2-3 working sets. Shoot for somewhere between about 5-8 total reps (2-3 reps per set) at anywhere from 80-90% of your 1RM. A minute or two of rest between sets should be sufficient.
- Try to make the weight feel lighter instead of heavier. Part of developing the skill of recovery comes from training yourself to exert no more energy than necessary to perform a given task.Although there’s a time and place to try to psych yourself up and give it everything you have, the goal of the strength work here is to help develop your ability to make hard things feel easy, rather than making easy things feel hard.
4. Recovery cool-down (5 min)
The last and final component of a Rebound Training session is to spend a few minutes driving your heart rate as low as possible. Your goal should be to get it down to within 5-10 bpm of your natural resting HR within those 5 minutes.
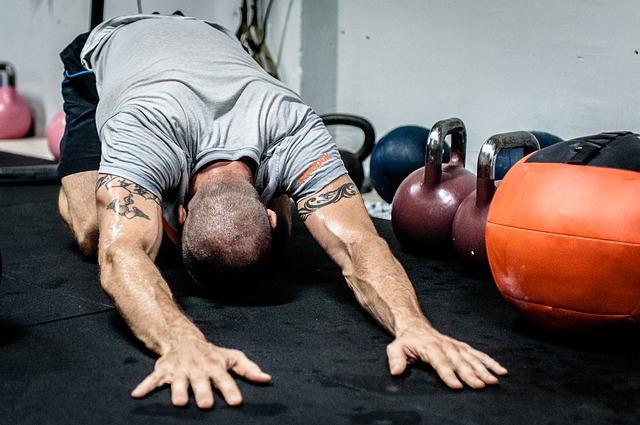
The easiest way to do this is to perform a couple of the recovery breathing exercises used at the beginning of the workout and along with some static and/or dynamic stretching. Finally, finish off with some light foam rolling (it should not be painful or it defeats the purpose in this case) or other form of soft tissue work and then head out the door because you’re done!
Try Rebound Training for yourself #RecoverToWin
Now that I’ve outlined what an effective Rebound Training session looks like, it’s time to give it a shot and feel the difference it can make for yourself. If you haven’t downloaded the free training template yet, make sure to do that now by clicking the button below.
My guess is that you’ll quickly discover, as I did once I started experimenting with them on myself and the people I train, that it’s incredibly refreshing to walk out of the gym feeling more energetic, less sore and stiff, and all-around better than when you walked in.
Once you experience this for yourself, you’ll see what makes recovery-driven fitness so effective and why recovery, rather than intensity, is the future of training.
If you’re a trainer or coach, I highly suggest taking one of your clients/athletes through a session to get their feedback as well.
Hint: one of the most important things you can do to keep your clients coming back to train with you is making sure they consistently feel better after a workout than they did before. It’s a rookie mistake to think smashing people into the ground every workout is the way to build a successful coaching business.
Once you get started with your own Rebound Training and see just how much of a difference it makes and you start seeing the results, make sure to report back on how you feel by posting in the comments below.

Hey Joel,
In trying to interpret my own HRV scores, my HRV device is on a 12 point scale. So would ANY increase in HRV score on the day following a workout be considered an improvement? For example I ran 4 miles earlier this week and my HRV score went from 9.0 the day of the run to 9.3 the day after the run.
Also, the improvement in HRV scores 3 – 5 days following a workout, wouldn’t that be difficult to delineate a positive training effect due to other workouts that might negatively interfere with the HRV scores?
I take my HRV readings in the mornings shortly after waking up but my runs are typically in the late afternoon which makes my post run HRV only about ~ 12 -15 hours apart not the 24 hours you mentioned in the article. Should I adjust my HRV schedule to be 24 hours post workout?
Thank you!
Patrick O’Flaherty
Great Article. Questions… do you use these sessions the day after, immediately after or later the same day of harder sessions? Could you use these sessions as your main training if you slowly increase the weight of the strength portion once the current weight becomes really easy?
Also what method do you use to determine Max HR (12min test, 220-age?)
Great article as usual. I have a question: I’m recovering from a back injury, and I can’t strength train my back during this period, so can I skip the strength stimulation component temporarily, or maybe replace with something that doesn’t involve the back directly? Thanks ahead.
Excellent article Joel. The data regarding elite soldiers is especially interesting, as this is primarily the group I work with. Can you provide a citation for the study you referenced ? I would like to use it in some of my research.
I look forward to more information on this key fitness component.
email me directly and I can send you the papers I referenced.